android.process.media is a common issue which can occur anytime and is caused mainly because of two applications, the Download Manager and the Media Storage.
Before we conclude that this cannot be solved without the support of a technician, i would suggest you give a try to the following methods as it has worked for many.

Method 1: Clear Cache & Data
- Go to Settings >Applications >Manage Applications and make sure to look under the ‘all’ tab. Scroll down and find Google Services Framework and clear the cache and data for this one.
- After doing that, scroll down and find Google Play. Tap on it and clear cache+data for this one too.
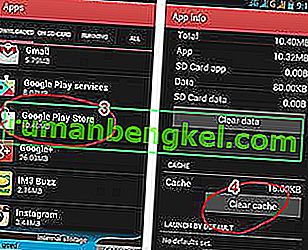
- Now press the back button and choose Google Services Framework from all apps >Force stop >Clear cache >OK
- Now open Google Play from you app drawer and when given an error, click OK.
- Turn off your device by holding the power button and clicking on Shut down/ Reboot.

Turn the device back on and go back to apps and turn the Google Services Framework back on; then test to see if issue is resolved; if not then proceed with Method 2:
Method 2: Resetting App Preferences
- Open your Settings on your phone.
- Browse for an “Application Manager” or “Apps”. As different phones vary, the name can always be different.
- Now you will see different applications listed in front of you. Without changing anything else, look for the menu (many phones have it on the upper right side while some may find it after clicking the menu button on their phones).

- Here you find an option of “Reset App Preferences”. Click it and hopefully, you will be free of all worries.


Method 3: Clearing Contacts and Contact Storage
This may erase your contacts so please back them up before performing this method. Many people face the problem because they have problem syncing their contacts with Google. Although it may seem like nothing, it tampers with the phone and as a result, you see the error message popping up.
- Open Settings on your phone.
- Procure um “ Gerenciador de aplicativos ” ou “ Aplicativos ”. Como os vários telefones variam, o nome pode sempre ser diferente.
- Agora procure o aplicativo “ Contatos ” em todos os aplicativos listados. Clique nisso.

- Aqui você verá uma opção de “ Armazenamento ”. Clique.
- Agora limpe os dados e o cache ; espero que você esteja pronto para ir.


Método 4: desabilitando o armazenamento de mídia
- Abra Configurações no seu telefone.
- Procure um “ Gerenciador de aplicativos ” ou “ Aplicativos ”. Como os vários telefones variam, o nome pode sempre ser diferente.
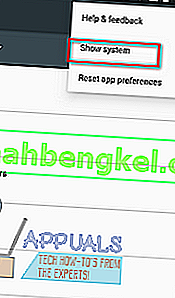
- Antes de continuar, procure as opções no canto superior direito e selecione “ Mostrar Sistema ”. Isso pode permitir que você localize o armazenamento de mídia na lista de aplicativos, se ainda não estiver visível.
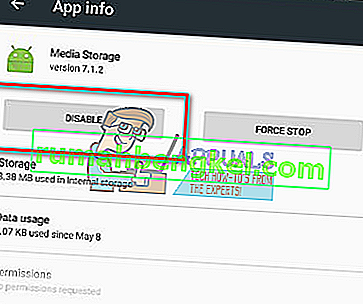
- Agora procure o aplicativo “ Armazenamento de mídia ” em todos os aplicativos listados. Clique nisso.

- Desative-o completamente clicando em Desativar .


Método 5: verifique as configurações de sincronização e armazenamento de mídia do Google
Certifique-se de ter um backup completo das imagens antes de tentar este método.
- Pare a sincronização do Google. Você pode fazer isso acessando Configurações > Contas e pessoais > Google Sync> Desmarque todas as caixas de seleção
- Desative e limpe todos os dados de armazenamento de mídia. Para fazer isso, vá para Configurações > Aplicativos > Todos os aplicativos > encontre o Armazenamento de mídia > Limpar dados > Desativar
- Desative e limpe os dados do Download Manager usando o mesmo método acima.
- Depois de fazer isso, desligue o dispositivo e ligue-o.
- Depois de fazer isso, a mensagem não deve aparecer
Para garantir que seu dispositivo Android faça o mesmo trabalho de antes, ative o gerenciador de download, o Google Sync e o gerenciador de download.