Nord VPN é um dos jogadores mais antigos no mundo VPN e seu aplicativo Windows é considerado um dos melhores no mundo do PC. Nord VPN é muito diverso se falado em termos de funcionalidade e flexibilidade. Além do suporte multiplataforma, ele também possui diferentes servidores localizados em diferentes países para você escolher.

Apesar do aplicativo estar no mercado há muito tempo, os usuários estão relatando que não conseguem se conectar ao Nord VPN. Ele interrompe a conexão após uma possível atualização ou a solicitação aos servidores DNS retorna uma resposta de 'tempo limite'.
O que faz com que o Nord VPN não se conecte?
Uma vez que uma VPN usa toda a arquitetura da Internet de um sistema de computador, há vários motivos pelos quais seu Nord VPN pode não conseguir se conectar corretamente. Alguns deles estão listados abaixo.
- IPv6: Aparentemente, o Nord VPN não suporta o protocolo IPv6 em nenhuma de suas comunicações. Portanto, se estiver habilitado, talvez você não consiga se conectar.
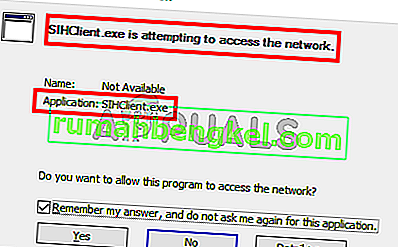
- Programas de terceiros : Sabe-se que os programas de terceiros entram em conflito com o sistema de software e competem por recursos; portanto, fazendo com que ele não se conecte corretamente.
- Adaptador de rede: como Nord usa um adaptador de rede separado para se comunicar com a Internet, pode ser que o adaptador de rede não esteja funcionando corretamente e você precise reiniciá-lo.
- Erro na rede: às vezes, as configurações de rede em seu computador podem estar em um estado de erro, causando nenhuma conectividade. Podemos tentar atualizar todas as variáveis neste caso.
Antes de começarmos com as soluções, você precisa ter certeza de que sua internet está realmente funcionando . Se a sua Internet não estiver funcionando corretamente, Nord não será capaz de estabelecer uma conexão adequada e fornecer acesso a uma rede em túnel.
Certifique-se de estar usando uma rede privada (não na escola, no trabalho ou em locais públicos como hospitais) e de não haver proxies envolvidos. Depois de verificar se sua Internet está funcionando bem, prossiga.
Solução 1: desabilitando IPv6
IPv6 (Internet Version Protocol 6) é a versão mais recente do IP na arquitetura de rede de um computador. Por padrão, ainda estamos usando IPv4 e ainda não fizemos a transição para IPv6 permanentemente. No entanto, pode haver alguns de vocês que começaram a usar o IPv6 para conectividade com a Internet. Parece que o IPv6 não funciona corretamente com Nord VPN. Portanto, iremos desativá-lo e verificar novamente.
- Clique com o botão direito no ícone de rede presente na barra de tarefas e selecione Abrir configurações de rede e Internet . Agora clique na opção Alterar opções do adaptador nas configurações.

- Uma vez nas configurações do adaptador, clique com o botão direito no adaptador que você está usando e selecione Propriedades .
- Uma vez nas propriedades do adaptador, desmarque a opção IPv6 e certifique-se de que IPv4 está habilitado. Salvar as mudanças e sair. Agora reinicie o computador e verifique se o erro foi resolvido e se você consegue se conectar ao Nord VPN.

Solução 2: Verificar aplicativos de terceiros
Existem vários outros aplicativos e programas que parecem entrar em conflito com o Nord VPN em sua operação. Se houver mais de um aplicativo tentando acessar um recurso, haverá uma condição de corrida e eles não funcionarão conforme o esperado.

Você deve abrir o gerenciador de tarefas (Windows + R e 'taskmgr') e verificar todos os aplicativos que estão sendo executados em segundo plano. Um desses aplicativos que era conhecido por causar problemas era o Glasswire Elite . Certifique-se de desinstalá-lo ou desabilitá-lo ao tentar se conectar ao Nord VPN.
Observação: você também pode tentar uma inicialização limpa do computador. Isso desativará todos os aplicativos externos de terceiros e iniciará apenas os necessários. Agora você pode tentar estabelecer uma conexão. Se você tiver êxito, significa que algum aplicativo está causando o problema. Você pode voltar ativando cada aplicativo e verificando novamente.
Solução 3: Alterar a localização do servidor
O Nord VPN dá aos usuários a opção de selecionar a localização do servidor. Esses servidores estão espalhados pelo mundo e fornecem conectividade de acordo com sua localização geográfica, ou seja, espera-se que um servidor mais próximo de você seja mais rápido. Tentaremos alterar a localização do servidor ao qual você está tentando se conectar e ver se isso resolve o problema de não conexão.
- Inicie o Nord VPN e clique no título Servidores presente na parte superior do aplicativo.

- Agora selecione um servidor diferente do que antes e depois de selecionar, tente iniciar a VPN novamente. Se você tiver o mesmo comportamento, tente escolher outro servidor e testar a rede em outro site.
Solução 4: reiniciando o adaptador de rede / TAP
Nord VPN cria um adaptador de rede virtual em seu computador que pode ser usado para comunicar informações. Ele atua como uma ponte na qual Nord VPN modifica as configurações para que possa iniciar e manter uma conexão VPN. Às vezes, isso entra em um estado de erro, fazendo com que você não se conecte ao servidor VPN. Vamos reiniciar o adaptador corretamente, o que garantirá que todas as configurações do mesmo sejam reiniciadas.
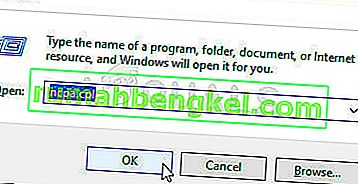
- Pressione Windows + R, digite “ ncpa. cpl ”na caixa de diálogo e pressione Enter.
- Todos os adaptadores de rede serão listados na sua frente. Selecione o adaptador TAP, clique com o botão direito e selecione Desativar .

- Após desativá-lo, espere um minuto. Em seguida, clique com o botão direito novamente e selecione Ativar . Agora tente conectar o Nord VPN e veja se isso funciona.
Solução 5: esvaziar a pilha da rede
Existem inúmeros exemplos em que limpar (atualizar) a pilha de rede em seu computador resolve vários problemas relacionados à VPN (incluindo Nord). Este processo irá liberar suas configurações de DNS e IP e garantir que não haja configurações inadequadas que possam estar em conflito com o aplicativo.
- Pressione Windows + S, digite “prompt de comando” na caixa de diálogo, clique com o botão direito do mouse no aplicativo e selecione Executar como administrador .
- Uma vez em um prompt de comando elevado, execute os seguintes comandos, um a um, seguidos pela tecla Enter após cada comando:
ipconfig / release ipconfig / flushdns ipconfig / renew netsh winsock reset interface netsh interface ipv4 reset netsh interface ipv6 reset netsh winsock reset catálogo netsh int ipv4 reset reset.log netsh int ipv6 reset reset.log

- Agora feche o prompt de comando e tente iniciar o Nord VPN novamente. Verifique se você pode se conectar com ele corretamente.
Solução 6: reinstalando o Nord VPN (junto com o adaptador TAP)
Se todos os métodos acima não funcionarem, você precisa ter certeza de que a instalação do Nord está correta e não há nada de errado com os arquivos de instalação. O adaptador TAP também será reinstalado no processo porque Nord VPN gerencia o adaptador e é apenas para seu uso. Certifique-se de estar conectado como administrador. Se a reinstalação não funcionar, certifique-se de que suas credenciais estejam corretas, pois você está entrando nos serviços e não expiraram.
- Pressione Windows + R, digite “appwiz.cpl” na caixa de diálogo e pressione Enter.
- Uma vez no gerenciador de aplicativos, pesquise a entrada Nord VPN na lista, clique com o botão direito sobre ela e selecione Desinstalar .

- Agora reinicie o computador e baixe o aplicativo novamente do site oficial do Nord VPN. Agora, depois de inserir suas credenciais, tente se conectar novamente e verifique se você consegue estabelecer a conexão VPN corretamente.
Solução 7: usando um serviço VPN alternativo
Existem vários clientes VPN no mercado Windows. No entanto, recomendamos aos leitores que experimentem o CyberGhost. Este serviço VPN é o mais simples possível e também oferece servidores localizados em diferentes países. Ele ainda tem servidores VPN separados para streaming de Netflix e BBC com facilidade. Siga os passos abaixo para baixar o aplicativo e ter sua conexão segura em nenhum momento.
- Download CyberGhost from (here).

- After downloading the VPN, install it on your computer. You might be asked for proper permissions. Make sure that you are logged in as an administrator and press Yes to all the permissions asked.
- After CyberGhost is installed on your computer, launch it. Here you will see a list of different servers available along with the distance from your actual location (more distance means slower internet).

- After selecting the server, click on the power button present at the right-hand side of the application. You can also select dedicated servers for torrenting and streaming (present at the left navigation pane).
Solution 8: Disable Firewall
In some cases, the default Windows Firewall might be preventing the application from working properly. Therefore, in this step, we will first be allowing it through the Firewall and make sure that it isn’t blocked by the Firewall and then we will also make sure that Windows Defender has it added as an exception. For that:
- Press “Windows” + “R” to launch the Run prompt.
- Type in “ControlPanel” and press “Enter” to launch the classical control panel interface.

- Click on the “View by:” button, select “Large Icons” and then click on the Windows Defender Firewall option.
- Select the “Allow an app orfeature through the Firewall” button on the left pane and then click on the “Change Settings” button and accept the prompt.
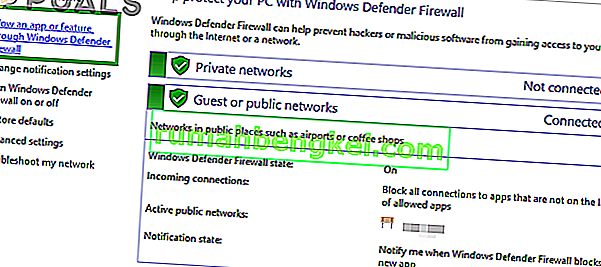
- From here, make sure that you check both the “Public” and the “Private” options for Nord VPN and its related applications/drivers.
- Save your changes and exit out of the window.
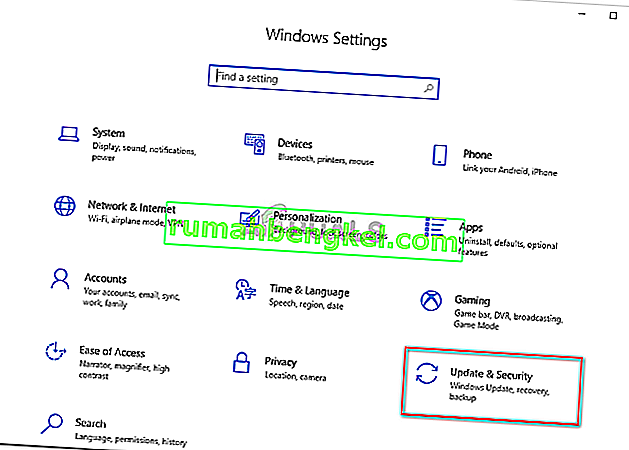
- After that, press “Windows” + “I” to launch the settings and click on the “Updateand Security” option.
- From the left pane, click on the “Windows Security” button and then click on the “Virus and Threat Protection” button.
- Select the “Manage Settings” button under the Virus and Threat Protection Settings heading.
- Scroll down and click on the “Add or Remove Exclusions” button in the next window.
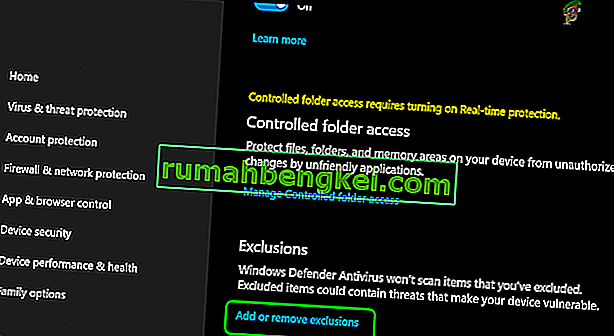
- Click on the “Add an Exclusion” option and select “Folder’ from the File type.
- Make sure to specify the Nord VPN folder and exit out of this window after saving your changes
- Check and see if doing so has fixed the issue with Nord VPN not connecting.


Solution 9: Change NordVPN Protocol
It is possible that Nord VPN might be running into issues while trying to connect to its servers due to the protocol configuration in its settings. If one type of protocol isn’t working for you, it is always recommended to try and switch to the other protocol to make sure that the issue isn’t tied to the wrong selection of the protocol type automatically or manually. For that:
- Launch NordVPN and make sure to disconnect from any currently active sessions.
- Click on the “Gear” icon on the top right corner and go into the settings.
- Click on the “Advanced” option from the left-hand side menu.
- Click on the “Protocol” dropdown and check on “TCP”.
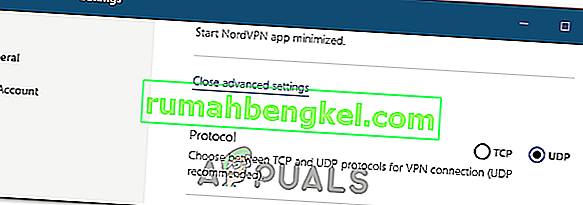
- This should change your protocol from TCP to UDP.
- Check to see if doing so fixes the issue for your computer.
- To Verify that none of the protocols work, make sure to repeat the steps and select “UDP” instead of TCP and then check again.
- If none of the selected protocols are able to make a connection with the server, move on to the other fixes.

Solution 10: Changing DNS Server Configuration
DNS Servers are used by the computer to establish a stable and secure internet connection with other sites on the internet, however, if the computer is unable to detect the DNS settings properly, or if the selected DNS server is facing outage, Nord VPN might not connect properly. Therefore, in this step, we will be changing the DNS configuration to ensure that DNS isn’t an issue. For that:
- Press “Windows” + “R” to launch the Run prompt.
- Type in “ncpa.cpl” and press “Enter” on the keyboard to launch the network configuration panel.
- Right-click on your internet connection and select the “Properties” option.
- Double click on the “Internet Protocol Version4 (TCP/IPV4)” option and check on the “Use the following DNS addresses” button.
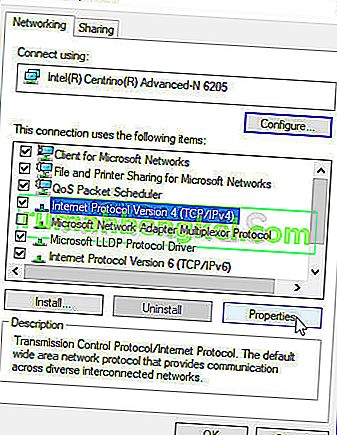
- At first, type in “8.8.8.8” and “8.8.4.4” in the primary and the secondary DNS addresses field respectively and click on “OK”. After that, check to see if NordVPN is connecting, if it isn’t, try to use “103.86.96.100” and “103.86.99.100” in the primary and the secondary fields respectively.
- Check to see if you are able to make a connection by selecting those DNS servers.


Solution 11: Opening Ports
For some people, the issue might arise if the ports that NordVPN uses to communicate with its servers are being blocked by your router. For security reasons most routers often block ports used by VPN/Network Tools to prevent any alterations to your connections and if that is the case, we will have to open the ports by logging in to the router’s control panel. For that:
- Press “Windows” + “R” to launch the Run prompt and type in “cmd” and then press “Ctrl” + “Shift’ + “Enter” keys on your keyboard to provide admin permissions.

- Type in the following command in the command prompt to list the IP information.
ipconfig /all
- The computer will list all the information of the network adapters connected to your computer.
- Under the default gateway option, after the mac address, there should be an IP address that should look something like “192.168.x.x”.
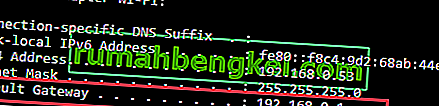
- Copy this IP address and launch your browser.
- Paste the IP address within a new tab on the browser and press “Enter” to navigate to the browser’s login page.
- Once on the login page, log into the control panel with your credentials, both of which, i.e the username and password should be written on the back of your internet router. If not, then the username should be admin and the password should be the Wifi password that you use to connect your devices.
- After logging into the Control panel, look around for a “NAT” or “Port” option that allows you to forward ports.
- Type in “500” and select “UDP” from the list.
- Click on “Save” to forward the 500 UDP port and exit out of the control panel after the change has been made.
- Try connecting with Nord VPN and check to see if the issue persists.


Solution 12: Use Hotspot
Mostly, this error can be fixed simply by employing your mobile’s hotspot connection instead of the Wifi or the Wired connection that you are already using on your computer. This does seem an inconvenience for Data conscious people but it seems to be the only way some people are able to connect through Nord VPN as some routers block it completely.
Note: In addition to this, you can try to change the firmware on your router to avoid any permanent blocks put from the router or to eliminate any bugs with the connection.